-
Notifications
You must be signed in to change notification settings - Fork 267
added docs for the graph #761
New issue
Have a question about this project? Sign up for a free GitHub account to open an issue and contact its maintainers and the community.
By clicking “Sign up for GitHub”, you agree to our terms of service and privacy statement. We’ll occasionally send you account related emails.
Already on GitHub? Sign in to your account
Closed
Closed
Changes from all commits
Commits
Show all changes
4 commits
Select commit
Hold shift + click to select a range
File filter
Filter by extension
Conversations
Failed to load comments.
Loading
Jump to
Jump to file
Failed to load files.
Loading
Diff view
Diff view
There are no files selected for viewing
This file contains hidden or bidirectional Unicode text that may be interpreted or compiled differently than what appears below. To review, open the file in an editor that reveals hidden Unicode characters.
Learn more about bidirectional Unicode characters
| Original file line number | Diff line number | Diff line change |
|---|---|---|
| @@ -0,0 +1,198 @@ | ||
| --- | ||
| title: The Graph | ||
| lang: en-US | ||
| description: Learn how to use The Graph to quickly access event data from any contract. | ||
| --- | ||
|
|
||
| import { Callout } from 'nextra/components' | ||
|
|
||
| # The Graph | ||
|
|
||
| Getting historical data on a smart contract can be frustrating when building a dapp. [The Graph](https://thegraph.com/) provides an easy way to query smart contract data through APIs known as subgraphs, which utilize GraphQL. The Graph’s infrastructure relies on a decentralized network of indexers, enabling your dapp to become truly decentralized. | ||
|
|
||
| ## Quick Start | ||
|
|
||
| These subgraphs only take a few minutes to set up and get running. To get started, follow these three steps: | ||
|
|
||
| 1. Initialize your subgraph project | ||
| 2. Deploy & Publish | ||
| 3. Query from your dapp | ||
|
|
||
| Pricing: **All developers receive 100K free queries per month on the decentralized network**. After these free queries, you only pay based on usage at $4 for every 100K queries. | ||
|
|
||
| Here’s a step by step walk through: | ||
|
|
||
| ## 1. Initialize your subgraph project | ||
|
|
||
| ### Create a subgraph on Subgraph Studio | ||
|
|
||
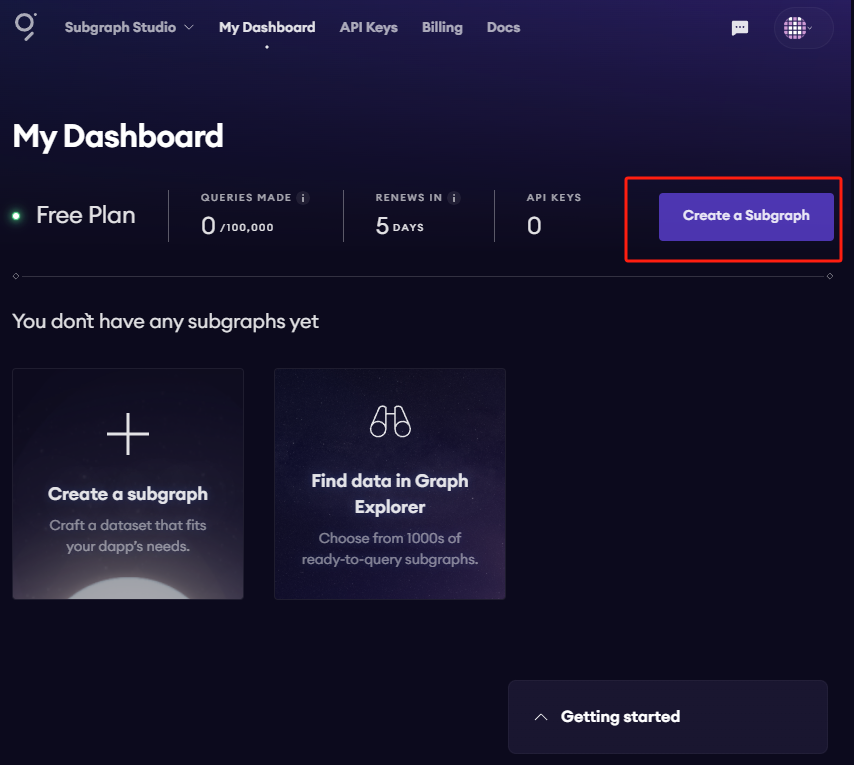
| Go to the [Subgraph Studio](https://thegraph.com/studio/) and connect your wallet. Once your wallet is connected, you can begin by clicking “Create a Subgraph”. Please choose a good name for the subgraph because this name can’t be edited later. It is recommended to use Title Case: “Subgraph Name Chain Name.” | ||
|
|
||
|  | ||
|
|
||
|
|
||
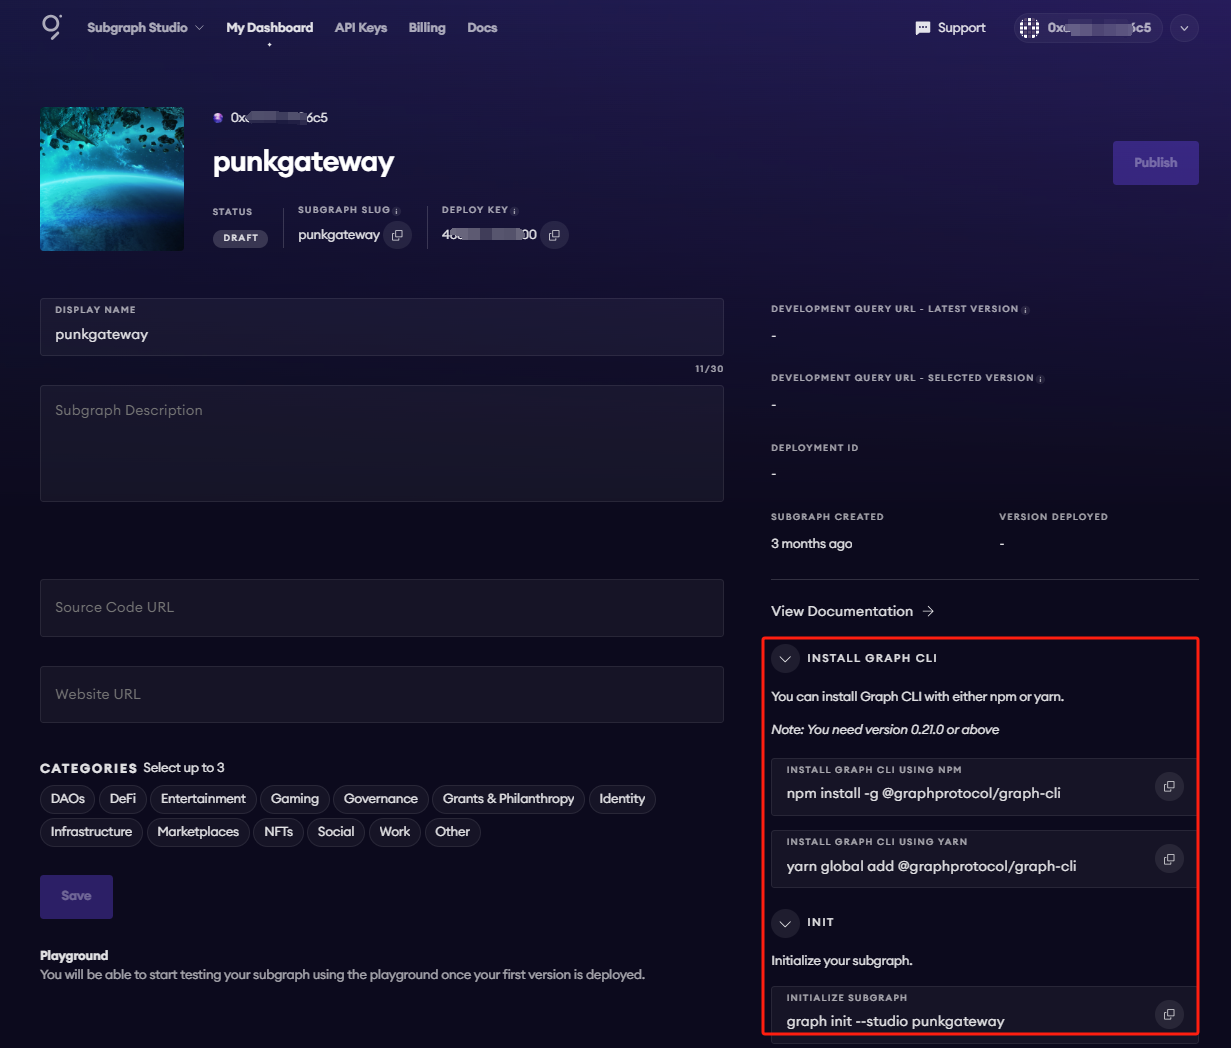
| You will then land on your subgraph’s page. All the CLI commands you need will be visible on the right side of the page: | ||
|
|
||
|  | ||
|
|
||
|
|
||
| ### Install the Graph CLI | ||
|
|
||
| On your local machine run the following: | ||
| ``` | ||
| npm install -g @graphprotocol/graph-cli | ||
| ``` | ||
| ### Initialize your Subgraph | ||
|
|
||
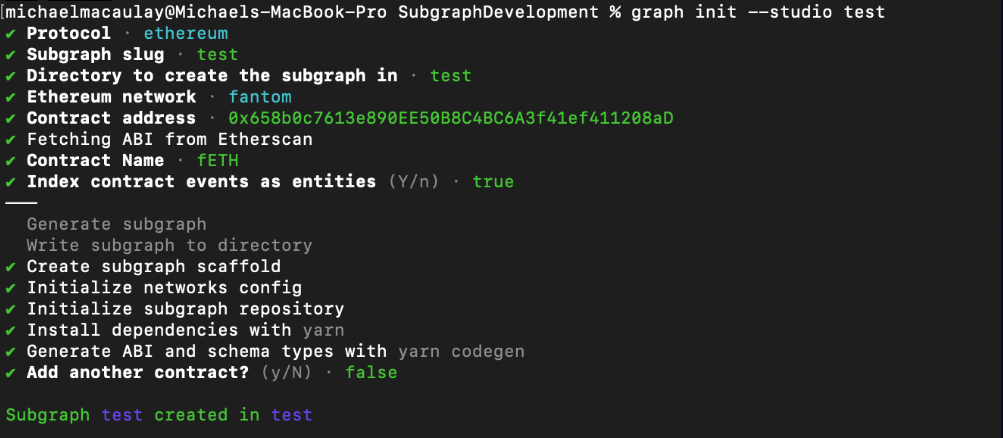
| You can copy this directly from your subgraph page to include your specific subgraph slug: | ||
| ``` | ||
| graph init --studio <SUBGRAPH_SLUG> | ||
| ``` | ||
| You’ll be prompted to provide some info on your subgraph, like this: | ||
|
|
||
|  | ||
|
|
||
|
|
||
| Simply have your contract verified on the block explorer and the CLI will automatically obtain the ABI and set up your subgraph. The default settings will generate an entity for each event. | ||
|
|
||
| ## 2. Deploy & Publish | ||
|
|
||
| ### Deploy to Subgraph Studio | ||
|
|
||
| First run these commands: | ||
|
|
||
| ```bash | ||
| $ graph codegen | ||
| $ graph build | ||
| ``` | ||
|
|
||
| Then run these to authenticate and deploy your subgraph. You can copy these commands directly from your subgraph’s page in Studio to include your specific deploy key and subgraph slug: | ||
|
|
||
| ```bash | ||
| $ graph auth --studio <DEPLOY_KEY> | ||
| $ graph deploy --studio <SUBGRAPH_SLUG> | ||
| ``` | ||
|
|
||
| You will be asked for a version label. You can enter something like v0.0.1, but you’re free to choose the format. | ||
alinobrasil marked this conversation as resolved.
Show resolved
Hide resolved
|
||
|
|
||
| ### Test your subgraph | ||
|
|
||
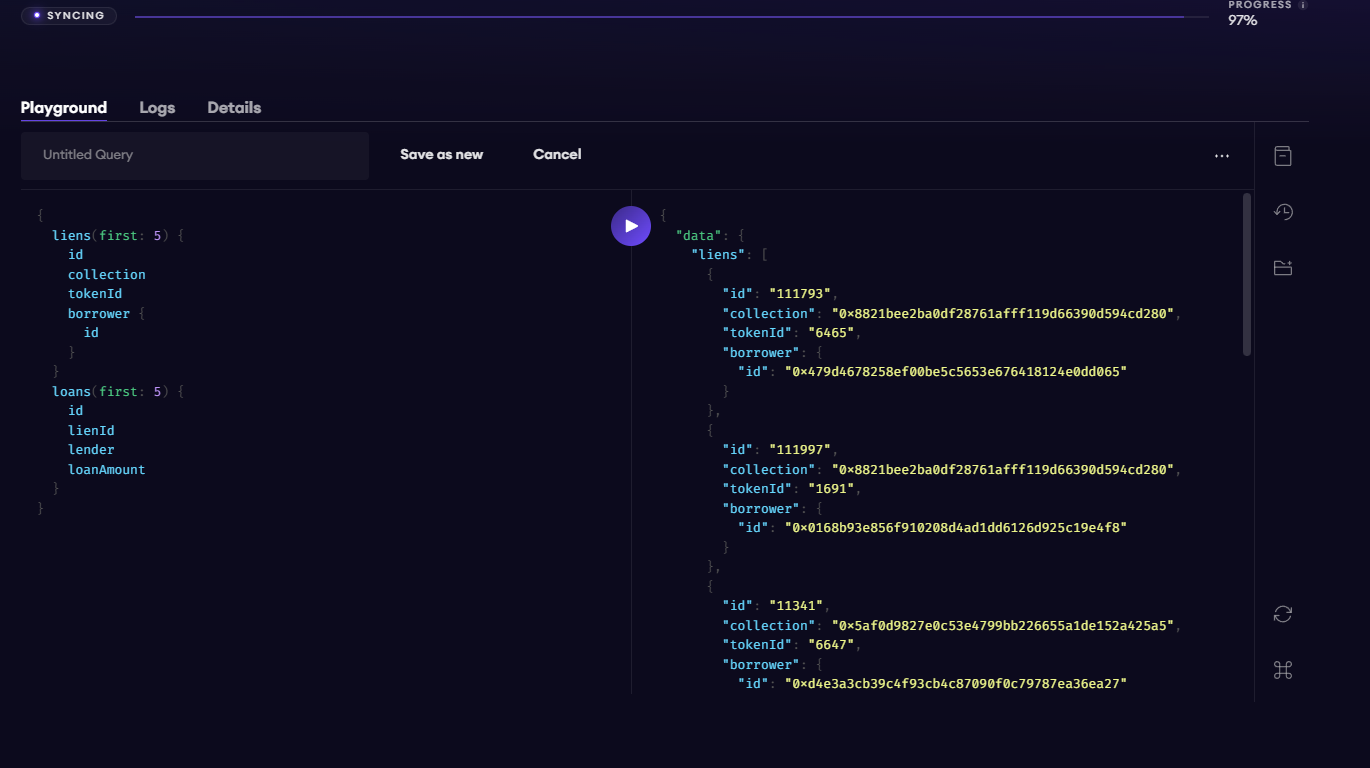
| You can test your subgraph by making a sample query in the playground section. The Details tab will show you an API endpoint. You can use that endpoint to test from your dapp. | ||
|
|
||
|  | ||
|
|
||
|
|
||
| ### Publish Your Subgraph to The Graph’s Decentralized Network | ||
|
|
||
| Once your subgraph is ready to be put into production, you can publish it to the decentralized network. On your subgraph’s page in Subgraph Studio, click on the Publish button: | ||
|
|
||
|  | ||
|
|
||
|
|
||
| Before you can query your subgraph, Indexers need to begin serving queries on it. To streamline this process, you can curate your own subgraph using GRT. | ||
|
|
||
| When publishing, you’ll see the option to curate your subgraph. As of May 2024, it is recommended that you curate your own subgraph with at least 3,000 GRT to ensure that it is indexed and available for querying as soon as possible. | ||
|
|
||
| 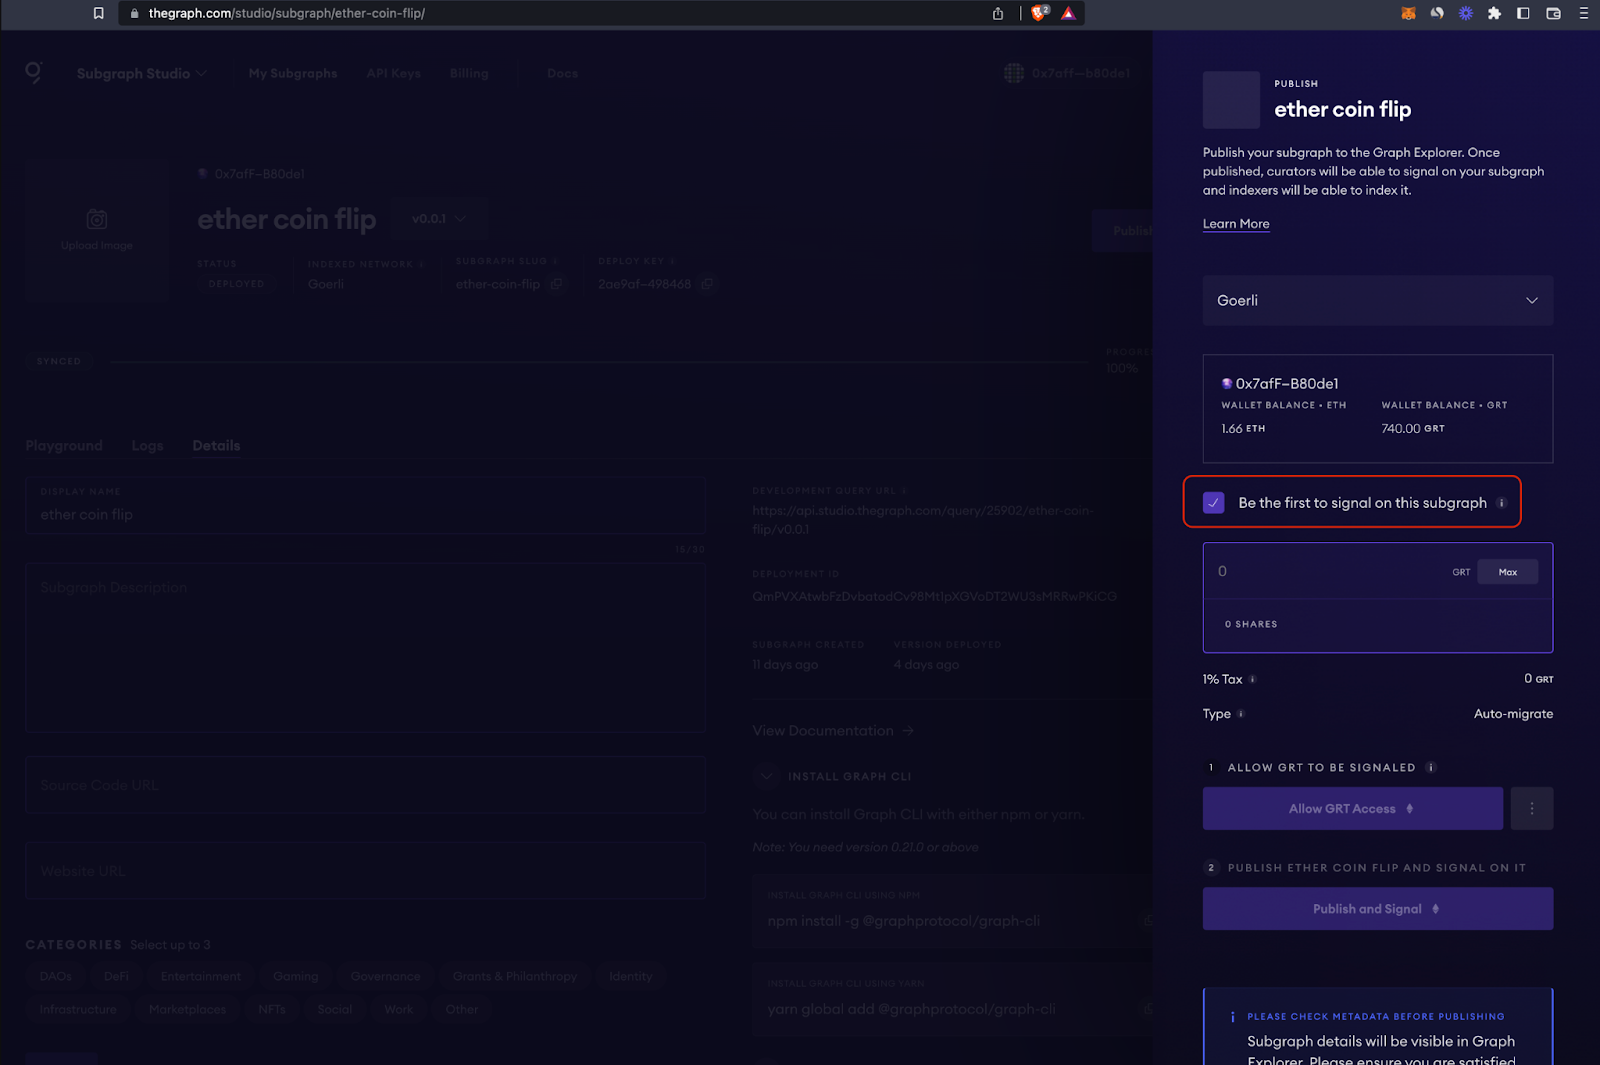 | ||
|
|
||
| ## 3. Query your Subgraph | ||
|
|
||
| Congratulations! You can now query your subgraph on the decentralized network! | ||
|
|
||
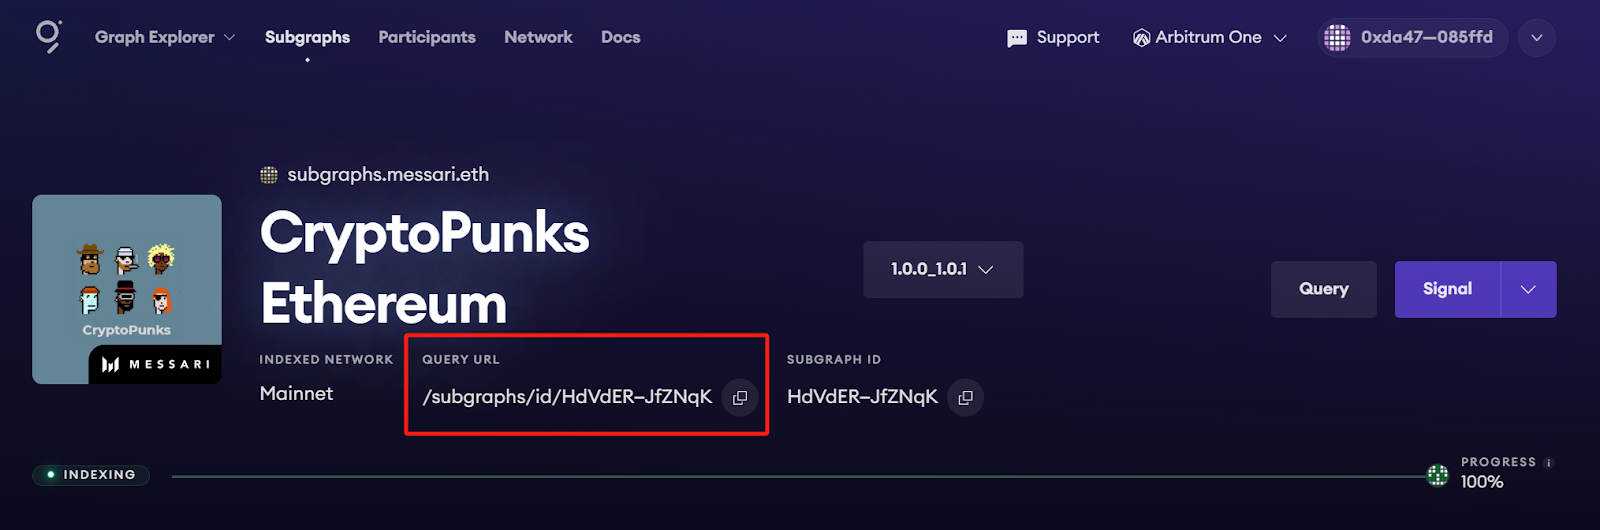
| For any subgraph on the decentralized network, you can start querying it by passing a GraphQL query into the subgraph’s query URL which can be found at the top of its Explorer page. | ||
|
|
||
| Here’s an example from the [CryptoPunks Ethereum subgraph](https://thegraph.com/explorer/subgraphs/HdVdERFUe8h61vm2fDyycHgxjsde5PbB832NHgJfZNqK) by Messari: | ||
|
|
||
|  | ||
|
|
||
|
|
||
| The query URL for this subgraph is: | ||
|
|
||
| https://gateway-arbitrum.network.thegraph.com/api/**[api-key]**/subgraphs/id/HdVdERFUe8h61vm2fDyycHgxjsde5PbB832NHgJfZNqK | ||
|
|
||
| Now, you simply need to fill in your own API Key to start sending GraphQL queries to this endpoint. | ||
|
|
||
| ### Getting your own API Key | ||
|
|
||
| 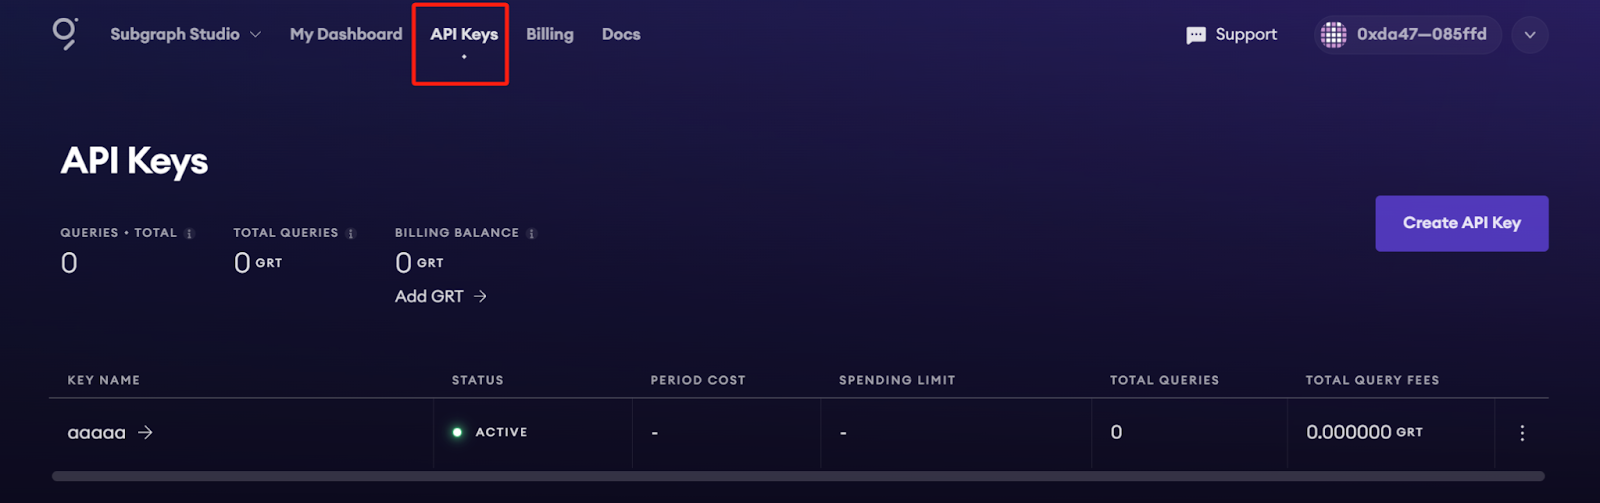 | ||
|
|
||
|
|
||
| In Subgraph Studio, you’ll see the “API Keys” menu at the top of the page. Here you can create API Keys. | ||
|
|
||
| ## Appendix | ||
|
|
||
| ### Sample Query | ||
|
|
||
| This query shows the most expensive CryptoPunks sold. | ||
|
|
||
| ```graphql | ||
| { | ||
| trades(orderBy: priceETH, orderDirection: desc) { | ||
| priceETH | ||
| tokenId | ||
| } | ||
| } | ||
|
|
||
| ``` | ||
|
|
||
| Passing this into the query URL returns this result: | ||
|
|
||
| ``` | ||
| { | ||
| "data": { | ||
| "trades": [ | ||
| { | ||
| "priceETH": "124457.067524886018255505", | ||
| "tokenId": "9998" | ||
| }, | ||
| { | ||
| "priceETH": "8000", | ||
| "tokenId": "5822" | ||
| }, | ||
| // ... | ||
| ``` | ||
|
|
||
| <aside> | ||
| 💡 Trivia: Looking at the top sales on [CryptoPunks website](https://cryptopunks.app/cryptopunks/topsales) it looks like the top sale is Punk #5822, not #9998. Why? Because they censor the flash-loan sale that happened. | ||
|
|
||
| </aside> | ||
|
|
||
| ### Sample code | ||
|
|
||
| ```jsx | ||
| const axios = require('axios'); | ||
|
|
||
| const graphqlQuery = `{ | ||
| trades(orderBy: priceETH, orderDirection: desc) { | ||
| priceETH | ||
| tokenId | ||
| } | ||
| }`; | ||
| const queryUrl = 'https://gateway-arbitrum.network.thegraph.com/api/[api-key]/subgraphs/id/HdVdERFUe8h61vm2fDyycHgxjsde5PbB832NHgJfZNqK' | ||
|
|
||
| const graphQLRequest = { | ||
| method: 'post', | ||
| url: queryUrl, | ||
| data: { | ||
| query: graphqlQuery, | ||
| }, | ||
| }; | ||
|
|
||
| // Send the GraphQL query | ||
| axios(graphQLRequest) | ||
| .then((response) => { | ||
| // Handle the response here | ||
| const data = response.data.data | ||
| console.log(data) | ||
|
|
||
| }) | ||
| .catch((error) => { | ||
| // Handle any errors | ||
| console.error(error); | ||
| }); | ||
| ``` | ||
|
|
||
| ### Additional resources: | ||
|
|
||
| - To explore all the ways you can optimize & customize your subgraph for a better performance, read more about [creating a subgraph here](https://thegraph.com/docs/en/developing/creating-a-subgraph/). | ||
| - For more information about querying data from your subgraph, read more [here](https://thegraph.com/docs/en/querying/querying-the-graph/). | ||
Add this suggestion to a batch that can be applied as a single commit.
This suggestion is invalid because no changes were made to the code.
Suggestions cannot be applied while the pull request is closed.
Suggestions cannot be applied while viewing a subset of changes.
Only one suggestion per line can be applied in a batch.
Add this suggestion to a batch that can be applied as a single commit.
Applying suggestions on deleted lines is not supported.
You must change the existing code in this line in order to create a valid suggestion.
Outdated suggestions cannot be applied.
This suggestion has been applied or marked resolved.
Suggestions cannot be applied from pending reviews.
Suggestions cannot be applied on multi-line comments.
Suggestions cannot be applied while the pull request is queued to merge.
Suggestion cannot be applied right now. Please check back later.
Uh oh!
There was an error while loading. Please reload this page.